


Belper Knolle Recipe
Dried for a long period in the cave and, when it is ready, Belper Knolle is served as small shavings, much as a truffle or Parmesan would be shaved to embellish culinary wonders.
-

Yield
1 Pound
-

Aging Time
~2 Months
-

Skill Level
Beginner
-

Author
Jim Wallace


Belper Knolle Recipe Info
Discover Belper Knolle
Origins & Story
A Surprising Favorite
What is Belper Knolle?
Ingredients
Total price for selected items: Total price:

Instructions
-


Heat & Acidify Milk
If using pasteurized milk, add about 1/8-1/4 tsp of Calcium Chloride at this point. Begin by heating the milk to 86°F (30°C). You do this by placing the milk in a pot or sink of very warm water. If you do this in a pot on the stove, make sure you heat the milk slowly and stir it well as it heats. You can use a thermometer but this is so close to our body temperature that when the milk feels neither cool nor warm it is close enough.
Note: You can try this with Goat milk as well, or even add a bit of cream for a richer base cheese, which might be tasty if you want to make this as an early eating cheese.
Once the milk is at your start temperature the culture can be added. To prevent the powder from caking and sinking in clumps sprinkle the powder over the surface of the milk and then allow about 2 minutes for the powder to re-hydrate before stirring it in.
Note: Some people prefer to add culture at room temperature and this works just fine, but this allows time for any unwanted bacteria in the milk to become players in the fermentation game.
We like to start this at 86°F (the bacterias optimum working temperature) and then just allow the resting milk to coast to room temperature as it acidifies and forms the curd.
-


Develop the Curd
Now, allow the milk to sit quietly on the counter at room temperature (68-74°F) for 12-14 hours. The milk will drop in temperature during this time to that of the room. During the winter it would be best to keep the pot covered with towels or a blanket to keep from getting cool. The best time to do this is in the evening, because the curds will be ready to drain in the morning and can be draining while you are busy doing other things or at work.
As the bacteria in the culture works, the milk sugar (lactose) is converted into lactic acid which increases the acidity of the milk and eventually causes the milk to form the curd.
The rennet included in the culture pack also helps to coagulate the milk. The milk will thicken into a gel after a few hours but really needs more time to become firm. The finished curd will begin to show whey rising to the surface. When this solidified mass shrinks slightly, visibly pulling away from the edges of the container, the curds are ready to be drained. The curd at this point will look like a big block floating in clear whey and perhaps even developing cracks in its surface.
-


Drain Curds & Release Whey
Our next task will be to separate the solids (curds, soon to become cheese) and liquid whey.
We will begin by lining our sanitized colander with the cheese cloth in preparation for draining. If you would like to save the whey for cooking or other uses simply drain it all into another pot.
You are now ready to transfer the curds to the draining cloth. Note the firmness of the curd in the photos below. Simply ladle the curds into the cloth and allow the whey to drain off.
Once the curds drain for a short time the cloth can be gathered, tied securely and hung for the final drainage. This can be done for several hours and even overnight, depending on how dry you want the final cheese.
I tend to make mine just dry enough that the curds will still hold together and form into a ball. If too wet the cheese is too sticky when molding and will tend to slump after molding. If it is too dry it will be a problem staying together.
To make sure the curd has dried uniformly I also find that it is helpful to open the cloth and mix the curds together at least once or twice during the draining.
-


Add Salt & Garlic
Now the fun begins! Once the curd has dried sufficiently, it is time to blend the salt and garlic into the curds.
I use 2-3 medium cloves of garlic chopped into small pieces. I add this to my mortar along with 1.5 tsp of the Himalayan Pink Salt, then using the pestle, I reduce this to a uniform paste (The salt helps in smooshing the garlic pieces).
The drained curd will have a moist dough like look to it.
Transfer the curd into a bowl along with the salt/garlic paste, then using the back of a large spoon, begin mashing the curds and paste uniformly. Allow this to sit while you prepare the black pepper coat.
-

Grind the Peppercorns
Before you form the cheese, grind the toasted peppercorns to a medium fine size. I find that a coffee mill reserved for spices works best but you could also do this in the mortar and pestle.
Spread this out evenly on a cookie sheet (or onto your counter top if you don't mind the mess).
-


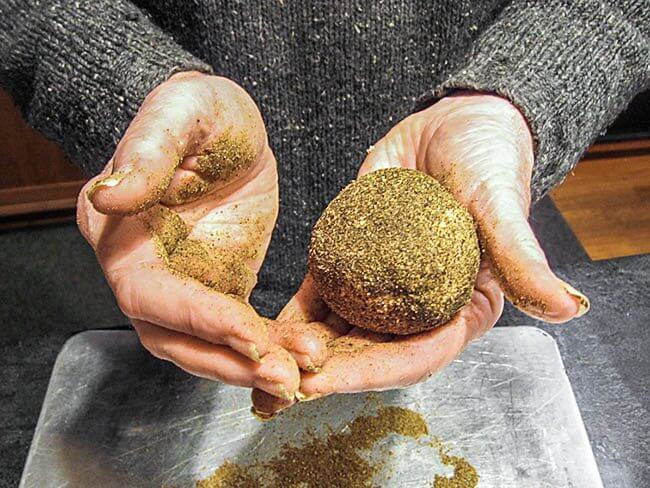
Form & Coat Cheese
Now that everything is mashed and blended, the cheese can be formed simply by taking a small hand full of this mix and form it into a ball just as you would a snowball. Yes, it's messy!
The one gallon batch should make about 5-6 of these slightly larger than golf ball sized cheeses. The final coat is simply a matter of rolling the cheese around in the ground pepper surface you have prepared.
The cheese will be quite tender at this point due to high moisture, so handle carefully as you transfer to the drying mats
-


Drying
The cheese now needs to be dried down before it is placed in the cave. I do this in a room at about 50-60°F and a moisture of 65-70% moisture. I also use a fan set at low/medium speed to increase the rate of moisture release.
The object here is to produce a nice firm and dry crust. This will become a lighter color as it dries. The pepper will also keep this drying surface free of molds.
-


Aging
Finally the cheese can go to the cave with about 52-56°F and 75-80% moisture. This higher moisture will now help in the aging of this cheese as it continues to dry to the center and achieve a uniform moisture that will be perfect for use as thin shavings.
The final cheese should be ready in 4-6 weeks but will continue to improve in flavor for a few months.
My last batch was made Nov. 22 and was ready by Jan. 1st.
This has a rather intense flavor so I suggest serving as small shavings that can be tasted as is, or used as a garnish, much as you would Parma (or Truffle) for pasta, salads, veggies or what ever you think is good.
The flavor of the pepper can be reduced by brushing the surface before shaving.
I use a truffle shaver here, but a sharp knife will also work quite well.
Cheese Making Supplies
Related Products
You May Also Like


