


Crottin de Chavignol Recipe
-

Yield
1 Pound
-

Aging Time
~2 Months
-

Skill Level
Intermediate
-

Author
Jim Wallace


Crottin de Chavignol Recipe Info
Crottin de Chavignol Overview
History of Crottin de Chavignol
About Crottin de Chavignol Cheese
Evolution and Modern Crottin
Ingredients
Total price for selected items: Total price:

Instructions
Making Crottin Style Cheese with Goat's Milk
The following is our recipe for making 4 nice cheeses from a gallon of goat milk. The guide can be easily doubled by increasing the ingredients proportionate to the milk volume.
-


Acidify & Heat Milk
Begin by bringing the milk to room temp 74°F (23°C).
Once the milk is at room temp the culture and geotrichum can be added. To prevent the powder from caking and sinking in clumps, sprinkle the powder over the surface of the milk and then allow about 2 minutes for the powder to re-hydrate before stirring it in.
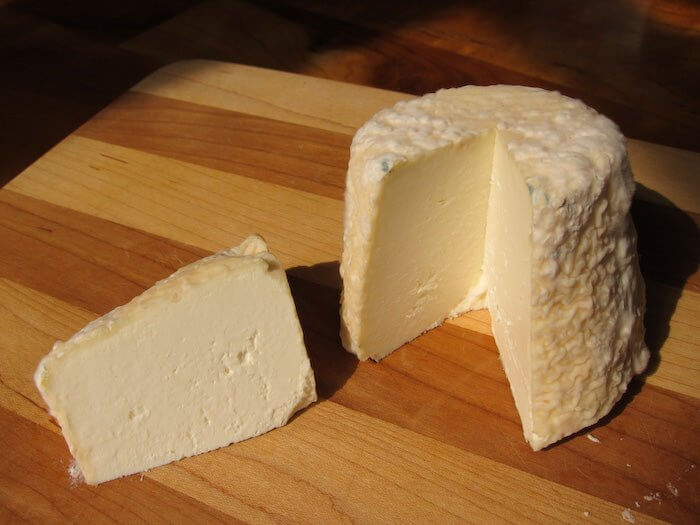
Also add about 1/16 tsp of our Geotrichum mold to the milk at the same time as adding the other cultures. This will develop into a thin white surface during aging and if the cheese and aging space are the right moisture, will develop into a typical convoluted surface on the cheese, as shown in the photo above.
-


Coagulation
If using the C20G Chevre Culture you will NOT need to add rennet because powdered rennet is already added to this culture packet to form a good curd.
If you are using the MA011 Culture, you will need to add 4-8 drops of strength liquid rennet. This will depend on your milk and how it coagulates. If the curd still seems weak after 24 hours, add a bit more next time. If you add too much, your curd will be difficult to drain.
The milk now needs to sit quiet for 18-24 hours while the culture works and produces the lactic acid that coagulates the curd. The thermal mass of this milk should keep it warm during this period. It is OK if the temperature drops a few degrees during this time but not below 72°F.
The indications that the curd is ready to ladle are that it has separated from the sides of the vat and there is a half inch layer of whey on top - plus there are usually cracks in the curd body. The temperature should have held steady throughout the night.
-


Transfer Curd to Colander
Line a draining colander with sanitized butter muslin in preparation for pre-draining the curd. A ladle can now be used to transfer the curds to drain in cheesecloth for 6-18 hours at a temperature of 68-72°F and then packed into Crottin forms.
They can be ladled in small scoops directly into the forms, but this is not traditional and will form a denser textured cheese.
-


Hang Curd to Drain
Once the curds have been gathered and briefly drained, they can be hung in the cloth to promote draining. The cloth can be opened and the curd mass mixed lightly to promote even drainage about half way through the drainage.
-


Mold the Curd
At this point the pre-drained curd is now ready to be transferred to the Crottin molds.
They will fill the molds, heaped to the top at first and then will settle to about 1/2 to 1/3 the mold height when fully drained. This may take another 12 hours.
-


Salting
About 2 hours after filling the molds, sprinkle a quarter teaspoon of kosher salt on the top of each curd in it's form.
The next morning, the cheese can be removed and turned back into the mold. Add another quarter teaspoon of kosher salt on the top of each curd in its form.
-


Drying
In the late afternoon, the cheeses are now ready to be removed from the molds and placed on drying mats to allow air to circulate on all sides. The drying room should be about 60-65°F, about 65-75% moisture and a small fan to circulate the air will be a big help in drying the residual moisture from the surface.
This drying may take 1-2 days during which you may see a different surface as the salt migrates into the cheese and some ambient yeast begin to form on the surface. Once the cheese surface takes on a matte appearance and all free moisture is gone from the surface, the cheeses are ready for the cave (or whatever you have for an aging space).
-


Aging Part One
At this point, the cheeses are ready for whatever aging you have intended for them but do try to give them the 2-3 weeks to develop some character. Even though the AOC has them on the table in 8-10 days, you will be happier with the character of this cheese after a few weeks of aging. The cheese needs to be placed on a surface that will allow air flow to the underside. I find that the small bamboo mats work well for this.
The aging space should be 48-52°F and 90% relative humidity with a gentle air flow over the cheeses. Turn the cheeses every day until they are completely covered with white mold. You should find this developing within ten days from drying the cheeses.
Many folks have trouble keeping a high enough moisture, so they keep the cheeses in covered plastic containers in a refrigerator or cold room so that there will be enough humidity. The top can be set ajar to let in air if there is condensation but if too much, should be wiped out daily. You will find that the cheeses can age for several weeks. It is a good idea to turn the cheeses and rub the mold down periodically to prevent the rind from getting too thick.
At about 10-12 days, the surface should be taking on a nice white appearance that will eventually lead to that nice rippled surface so characteristic of this cheese.
At this point the cheese can be held in a cooler space at 38-44°F.
-


Aging Part Two
From here on out, it is a matter of how much character you want to develop in your cheeses. As mentioned above, your cheese can age for quite some time or it can be consumed at just a few weeks old.
One of my favorite expressions from Charlie Papazian, the homebrew guru was: "same but different" and I think it definitely applies here in a big way.
The cheeses will continue to lose weight as they age and lose moisture and the surface will change considerably as new molds adapt to the drier surface. The body of the cheese will become much drier and denser. The flavor will also become much stronger, revealing more of the true capric flavors of an aged goat cheese.
As I understand, there was a time when the cheese makers would dry their cheeses in small wooden cages hung from their eaves outdoors during good weather or in open halls outside the cheese room to enhance flavor.
These photos show the cheese in various stages of aging and clearly show the changes in surface and transformation of the cheese body, mostly caused by enzymes produced by the surface molds.
One last thing, the basic fresh cheese is also excellent when rolled in herbs, peppers/chiles, even flowers. Especially when fresh during the summer.
Also, try the same thing with cows milk and you might be surprised. All of our friends here love this cheese when it's fresh and rolled in summer herbs or flower petals.
So, as we enter the New Year, I see it as another opportunity to explore new cheeses and meet new people making fabulous cheeses just the way people have been doing for centuries as well as the folks stepping out a bit and adding their own twist to their specialties. I'm already beginning to make my plans a trip to Italy and France once more.
Cheese Making Supplies
Related Products
You May Also Like


