


Wine Infused Cheese Recipe
-

Yield
2 Pounds
-

Aging Time
~6 Months
-

Skill Level
Intermediate
-

Author
Jim Wallace


Wine Infused Cheese Recipe Info
Wine Infused Cheese Inspiration
The Plan for Wine Infused Cheese
Cheese Making Details
A Showpiece Cheese
Ingredients
Total price for selected items: Total price:

Instructions
A Recipe for making a cheese infused with wine
The cheese I made while taking the photos below was a 4 gallon batch, the recipe I have written is for 2 gallon batch which tends to be a good size for home cheese makers. When working with two gallons of milk the yield will be approximately 2 lbs of cheese.
For a larger batch, ingredients can be increased proportionatly to the milk.
The wine I used in this recipe was a very dark and fruit forward Petit Sirah from my own cellar here.
Idealy we want to have the wine and cheese flavors complement each other. A longer acid development will also help the flavor development for this cheese. Our goal is to create a medium moisture cheese with an aging time of 2-4 months.
-

Acidify & Heat Milk
Begin by heating the milk to 88°F (31°C). You do this by placing the milk in a pot or sink of very warm water. Start with a water bath about 10-15°F above the target temperature for the milk and then reduce your temperature in the water bath with cold water additions as the milk approaches the target temperature.
If you do this by direct heat using a pot on the stove, make sure you heat the milk slowly and stir it well as it heats.
The wine should be brought out at this time and allowed to warm to room temperature until needed.
Once the milk is at 88°F, the culture can be added. To prevent the powder from caking and sinking in clumps, sprinkle the powder over the surface of the milk and then allow about 2 minutes for the powder to re-hydrate before stirring it in.
After adding culture, let the milk ripen for 60 minutes before adding rennet in the next step.
-

Coagulate with Rennet
Next add about 2.3 ml or slightly less than 1/2 tsp of single strength liquid rennet.
The milk now needs to sit quiet for 30 minutes while the culture works and the rennet coagulates the curd. You will notice the milk thickening at about 12 minutes but hold still for the full 30 minutes or until you see a good firm curd. Cutting early or late will affect the final cheese.
The thermal mass of this milk should keep it warm during this period. It is OK if the temp drops a few degrees during this time but do bring it up soon after cutting the curds (this should not be an issue if working with the water batch method).
During this wait time heat about 1.5 qts of water to about 140F and hold at this temperature for the upcoming curd cooking stage. I find this is at just about the warm settings on my small stove burner.
-

Cut Curds & Release Whey
Once you have determined that a good curd has formed, and then you are ready to cut into smaller 3/4 inch curds.
The larger cut size will keep more moisture in the final cheese.
For the higher moisture and larger curds, I tend to treat the cut curds very gently at all times when cutting and stirring.
Following the cut, allow the curds to rest for about 5 minutes to help the surface heal before stirring. A gentle lifting motion of the curds every minute or so will help to keep them separated and avoid any clumping together.
-


Cook the Curds
Next it is time to begin drying out the curds. If your temperature has dropped, bring it back to 88°F.
Allow the curds to settle to the bottom of the pot briefly, then remove about 1/3 of the original milk volume (about 42 oz. for each gallon of mik) as whey.
This will functionally be removing some of the food supply (lactose) and slow the cultures ability to produce acid.
The next step will be to add the 140°F water slowly in stages over the next 30 minutes. The final temperature should be about 102°F.
Following this the curds should be stirred (gently) for another 30-45minutes for the curd to release more whey. Remember to increase the temperature of your water bath to keep the curds warm.
The final curds should be cooked well through and should be examined to make sure that enough moisture has been removed. A broken curd should be firm throughout and the curds should have a moderate resistance when pressed between the fingers.
When this point is reached the curds can be allowed to settle under the whey
The common test for dryness is to press a handful of curds in the hand to consolidate the mass and then pressing with the thumb see how easily they release or break apart. The drier curds break apart quite easily, the moister curds tend to adhere slightly but still do break apart readily.
-


Remove the Whey
The curd now needs to be removed from the whey.
I do this here by allowing the curds to settle for a few minutes then float a sanitized plastic colander on the surface which then fills with whey which can be easily dipped off for other uses (this whey should make a good ricotta).
Once the majority of whey is removed, the dry curds can be transferred to a colander for final draining.
They should be gently stirred here to make sure that the whey drains off well and the curds do not consolidate.
It is important that the curds remain intact and separate.
-


Ripen the Curds
Once the whey has been released, return the curds to the pot and keep warm (102°F in the water bath/sink).
The curd at this point should have released most of the moisture required but still needs to be kept warm while the bacteria continues working to convert more lactose to lactic acid.
For the next 60 minutes the curd should be stirred occasionally but just enough to keep the curds from sticking together. Any accumulating whey can be poured off.
-


Add the Wine
And now for the wine, isn't this what we've all been waiting for?
I suggest using a wine like Merlot, Malbec, Syrah, nothing too austere or acid. Here I have chosen a Petite Sirah since I make my own wine here as well. I always have 4 barrels or so here in various stages of development so plenty to choose from.
At this point the curd should have reached the final moisture and acidity and are ready for their wine bath. The curds should still be warm 80-90°F and the wine about 10-15°F degrees cooler. This difference in temperature will encourage the curds to absorb the liquid (wine) more readily. Remember using the warmer water addition previously in the cooking stage causing more whey to flow out of the curd, This time the cooler wine is absorbed by the curd.
Next, Pour the wine onto the curds and stir just enough to keep them covered with wine to allow for an even infusion throughout the curds.
The longer the curd and wine remain in contact, the more color and flavor will be passed on to the finished cheese. I find about 1 hour to be sufficient.
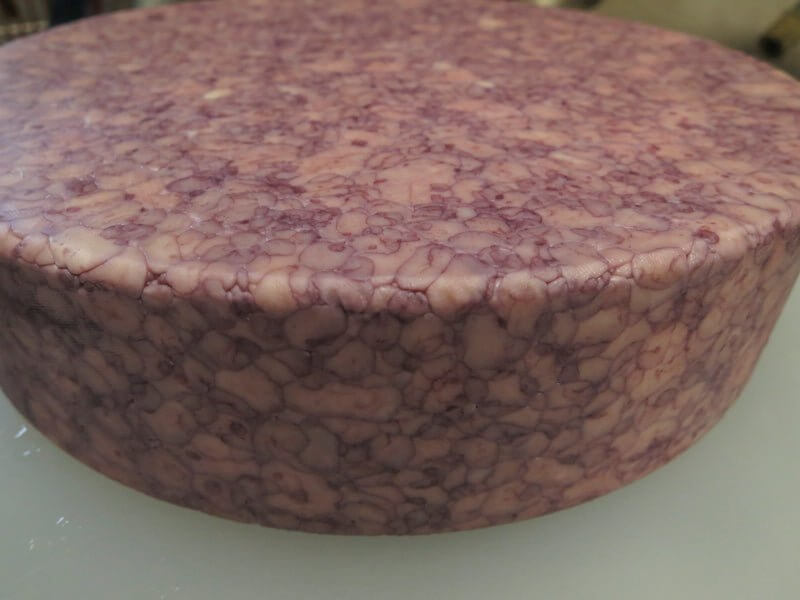
At this point each of the curds should have absorbed a nice wine color on the surface with a clean white interior as well as absorbing the flavor and aromatics from the wine. This makes for a rather dramatic presentation when pressed, looking like a mosaic of purple outlines surrounding each curd.
-

Salt & Form Curds
Once the curds have been well infused with the wine, drain off the excess wine and measure the salt.
About 2% by weight should be sufficient for a final cheese of about 1.5% salt. Our final cheese will be about 2 lbs therefore 0.64oz of salt will be needed (32oz x .02 = .64 oz).
Add 1/2 of this salt and stir it well into the curds, wait 5 minutes while the first dose of salt is absorbed and then repeat.
The curds should now be well salted, and ready for the mold.
Simply line the form with the draining cloth and transfer the curds, packing well with moderate hand pressure. Place the follower on top and you are ready for pressing.
-


Pressing
Next, for pressing we should begin very light and slowly increase the press weight to a moderate level:
- 60 minutes at 20 lbs
- 2 hours at 40 lbs
- 16 hours at 60 lbs
The rate of whey running off is simply a matter of drops and not a stream of whey being released. This is a good rate of whey removal during pressing and will slow even more as the residual free moisture is released. The form should show tears of whey weeping from the form very slowly. When this stops you can increase the weight slightly. The cheese should be removed from the press, unwrapped, turned, rewrapped, and put back to the press at the above intervals. To assure an even consolidation. At each turn you will notice the cheese has formed a smoother surface and rests lower in the mold.
As the cheese curds begin to consolidate with each turn in the press, the beauty of this cheese becomes apparent. As seen in the photos above.
-

Finishing & Aging
The cheese can now be waxed for aging. For details on waxing, please click here
The cheese can then be placed into your aging space at 52-56°F and 80-85% moisture.
The cheese can now be aged for 2-4 months and it will be ready for your table.
Cheese Making Supplies
Related Products
You May Also Like


